Hi-Rez prototypes: A couple things!
First, here’s a few links to some great graphics libraries with which to build from. Most of these are Photoshop files, but you may be able to open those in other graphics applications:
iPhone GUI one
iPhone GUI two
Android Gingerbread GUI: note, weird download format. Will need to also download a .rar file extractor.
Older Android GUI one
Older Android GUI two
iPad GUI
Palm Pre GUI
Finally, some tips regarding how to build your hi-rez prototype:
1) Every bit of information on display should feel “real” no words on top of a box that read “photo”, use an actual photo. Any bio information should be filled in in full, not simply say “bio info goes here.”
2) That feeling of reality extends to the prototype too–the more actual elements you can bring in from how the phone/mobile device you want to build works, the better. The graphics libraries linked up top are worth digging through.
3) You’re building these in a presentation program. Either Keynote or Microsoft Powerpoint are your best bets. If you’re a Mac User, Keynote is available as a free demo download from Apple, as part of the iWork suite (or the full version for $20 from the Mac App Store). If you’re a PC user, the chances that you don’t already have Powerpoint as part of Microsoft office is very very slim. But if you don’t, I believe it also is available as a download. WARNING: These are enormous downloads.
4) The key skill is understanding how to link from a button (i.e. any graphic element that you want to be a button) to another slide. Here’s a quick tutorial:
1) Select the thing that you want to make into a button.
2) In Keynote, go to the inspector (the little blue “i” button that says “inspector” below it) and then click on the Hyperlinks icon (the blue arrow). It will open a window that looks like this:

Configure your similarly: link to a slide, enter the slide number you want to link to. Done.
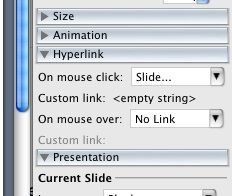
2b) In Powerpoint, when you’ve selected an object, the formatting palette changes. One of the options there is called “hyperlink”. On my version of Powerpoint (WARNING: Microsoft likes to change this a lot, so your version may be different), it looks like this:

Not as flashy, but it does the same thing. When you choose “slide” it pops up a dialogue box to chose your slide.
3) That’s about it. Just keep doing this for all your options. Remember that you can copy/paste linkages so it makes sense to build your base-level links first (things that will appear on every page) before you start so you can just copy & paste that stuff on each page instead of redrawing/linking.
Good luck!
Dan